
Capacity Calculator for Storage Spaces
There is no official information (that I am aware of) on how to calculate maximum capacity one can get from physical disks of different sizes in Storage Spaces. Based on partial documentation and logic, I got the formula that all my tests so far confirm correct. But of course, use at your own risk, since it is not official. The algorithm works for different disk sizes, resiliency types, and any column counts. It is coded into TSQL procedure you can use. Now you have a tool to predict the total capacity of your storage pool and make easier decisions when buying disks in the future!
The Logic
Capacity depends on:
- Type of Virtual Disk (simple, 2-way mirror, parity, …)
- Number of Columns (disks written in parallel – stripe)
- Disk sizes (of course 🙂 )
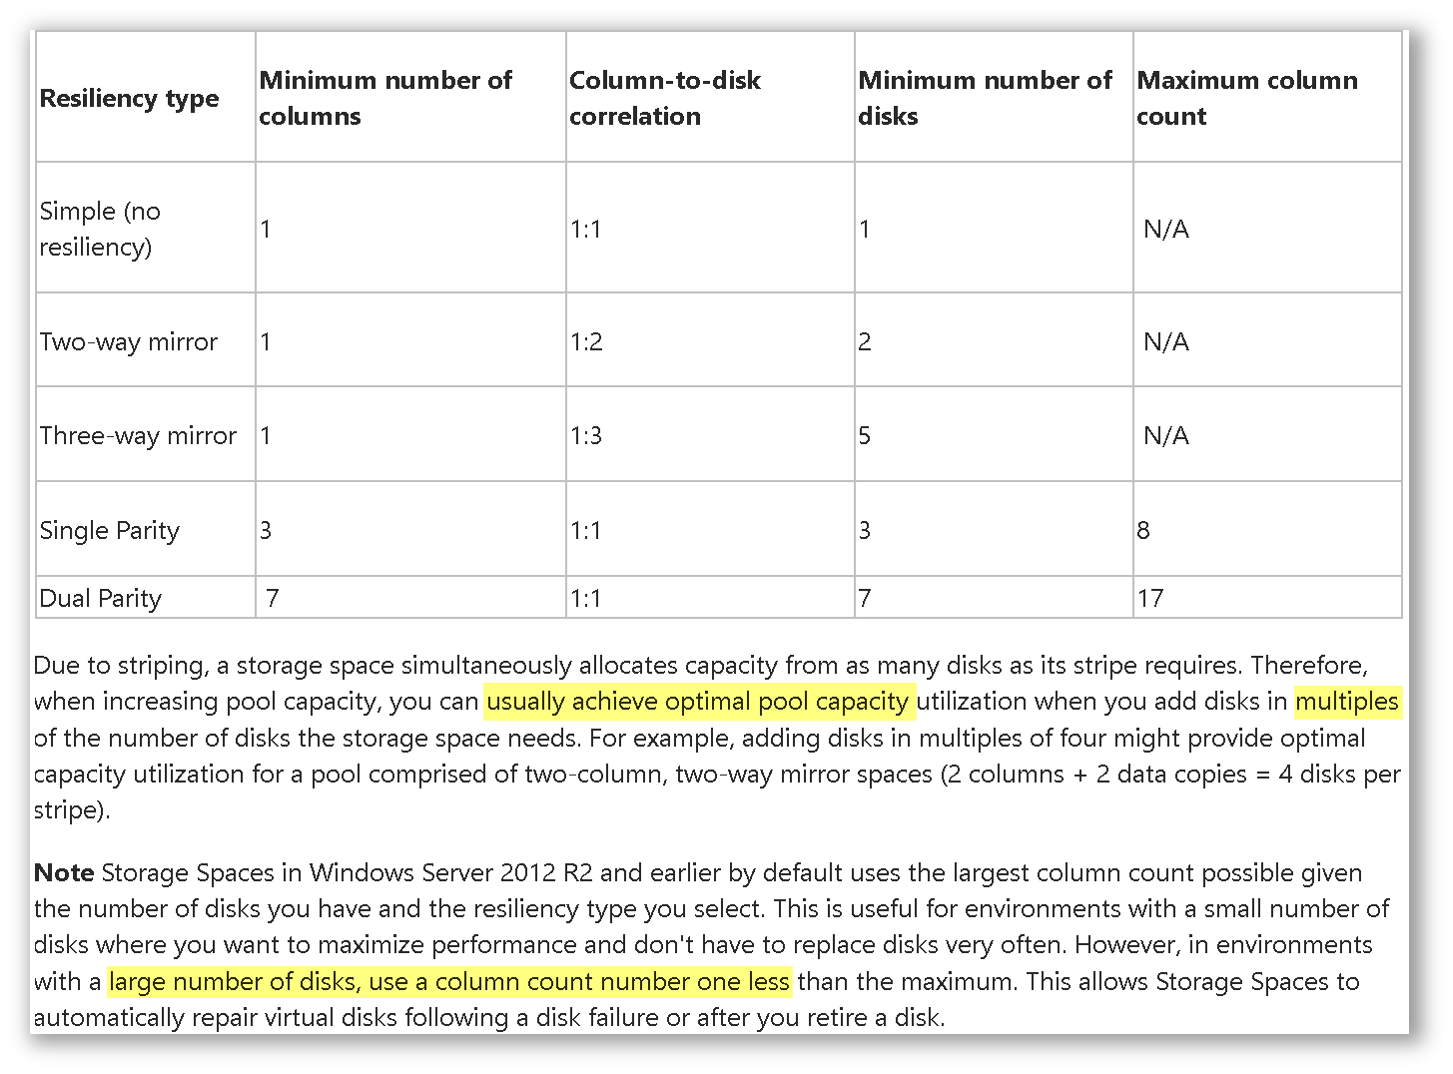
Official FAQ is very useful to read with particularly useful table of how column count relates to disk count accessed „at once“ or “in parallel” or in “stripe”. More columns – the faster is Virtual Disk. But also the greater chance for unusable space on mix-sized disks. Number of disks in a stripe is identical to number of columns for all except mirroring. To get the number of disks in a stripe (accessed in parallel) for mirroring, you need to multiply columns by 2 (or 3 for 3-way mirror):
Example
If we have 3 disks: 1TB, 1TB, 2TB, what is the total capacity of Simple (no resiliency) Virtual Disk with 2 Columns? 2 columns = 2 disks in a stripe. We can allocate from biggest 2 disks 1TB each (blue “stripe”), then 1TB of remaining 2 disks each (green “stripe”) = 4TB total capacity. Entire space is utilized, no “leftovers” – although we have different sizes of disks! How cool is that? 🙂
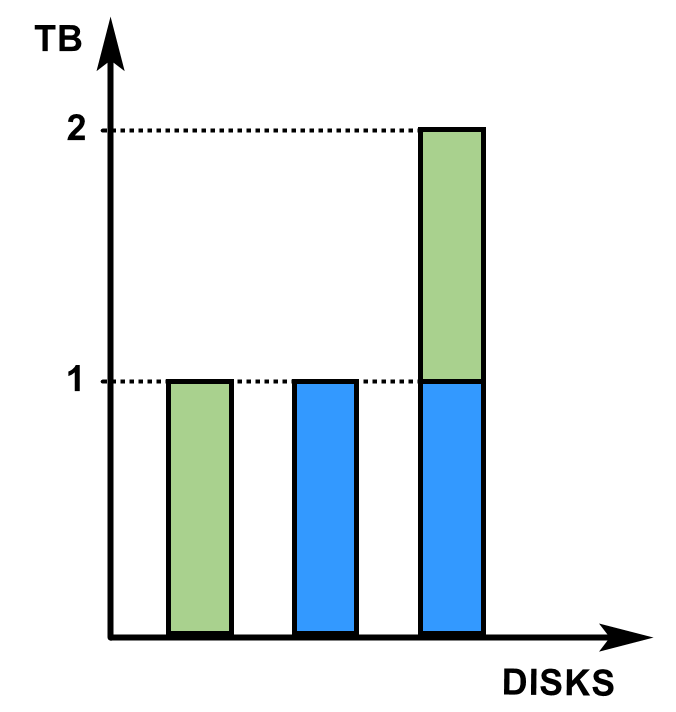
The same example can be applied for Mirroring with 1 column. 1 column = 2 disks in a stripe (because it is mirroring). That means we write two “disks at once”. The picture is the same, but capacity is half: 2TB, as blue stripe gives 1TB plus green stripe 1TB too. That is a natural “cost” of having the same data on 2 places for resiliency.
Example with 5 disks: 1TB, 1TB, 2TB, 3TB, 4TB, for Virtual Disk with PARITY and 3 columns (minimum columns for parity):
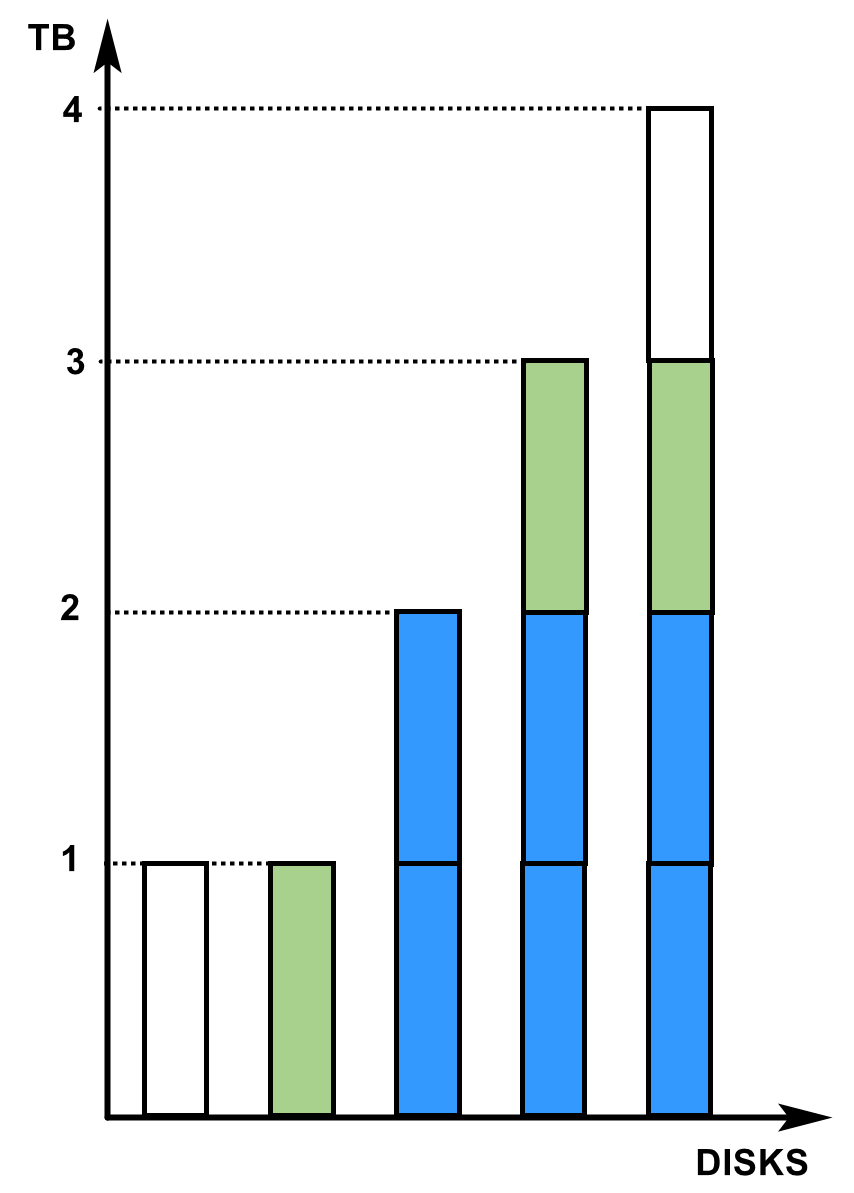
3 columns = 3 disks in a stripe (3 disks “written at once” or “accessed in parallel”). Going from the disk with the most free space (4TB disk) downwards, we count disks in stripe – which is 3. Free space of 3rd disk from the right is 2TB. We allocate 2TB of first 3 disks by painting them blue – the blue “stripe” is born! Again we count 3 disks starting from the one with the biggest free space – we get to 1TB disk, so 1TB is our next “max allocation” size. We allocate 1TB on 3 disks from the one with the biggest free space down – resulting in “green stripe”. Not that actual stripes are not as high as 1TB – they are by default 256KB high (default “Interleave” or allocation unit per each physical disk). We use max sizes here in order to calculate max capacity in as few steps as possible.
From the blue stripe we got 4TB capacity (6TB raw disk space minus 1 disk for “parity”). From the green stripe we got 2TB capacity. Total capacity is 4+2=6TB! Unusable „leftover“ is 2TB (white). We can experiment with different column counts or disk sizes and try to find a combination that fills entire space. Or, we can create another VD with columns=1 to use that remaining space, if we want to utilize every bit of space.
Capacity Calculator in TSQL
To make your life easier, I coded that algorithm into a TSQL stored procedure. The main part is here:
|
1 2 3 4 5 6 7 8 9 10 11 12 13 14 15 16 17 18 19 20 |
WHILE 1=1 BEGIN DELETE @TopN; -- otherwise rows would pile-up INSERT INTO @TopN SELECT TOP(@disksWritten) d.DiskId, 1 FROM #disks d WHERE d.FreeGB > 0 ORDER BY d.FreeGB DESC, d.DiskId DESC IF @@ROWCOUNT < @disksWritten BREAK; -- no more disks that could fit this write SELECT @chunkSizeGB = 1; SET @capacityGB += @chunkSizeGB * @disksWritten * @capacityPct; -- stripe size * capacity% IF @Debug = 1 SELECT capacityPct=@capacityPct, chunkSizeGB=@chunkSizeGB, disksWritten=@disksWritten, Multiplied= @capacityPct * @chunkSizeGB * @disksWritten, NewCapacity=@capacityGB IF @Debug = 1 SELECT t.* FROM @TopN t ORDER BY t.FreeGB DESC, t.DiskId DESC -- Decrease free space on disks UPDATE d SET d.FreeGB -= @chunkSizeGB FROM #disks d JOIN @TopN t ON t.DiskId = d.DiskId END; |
Download entire procedure code GetStorageSpaceCapacity here!
It gives two resultsets: summary, plus per-disk which is suitable for graphical presentation.
NOTE: If you are a developer and can implement a graphical presentation of the result, you are more than welcome to do it! I will put the link to your graphical calculator here. As an example, look at this RAID calculator.
Tips
- After adding a drive, we must „even out” the data across all disks by using optimize command. Otherwise, calculated max capacity won’t be possible to reach!
- Run „Optimize-StoragePool -FriendlyName MyPool” after adding drive(s)!
- Make sure OS is patched and the storage pool is upgraded to the latest version
- Run „Update-StoragePool -FriendlyName MyPool”
- Every VD „expand” (and initial “create”) operation takes space for metadata. That takes away around 1-2GB per disk, per expand.
- Eg. on 10 disks, initial create+2 VD expands might take about 30-60GB for total metadata.
- Since metadata is written to disks, you should be able to plug them into a different windows machine, and Virtual Disks should be recognized correctly – in theory. I haven’t tried yet. Let me know if you did, and I will update the post.
- Expand less frequently – use generous increase steps so you do not have to expand very frequently. But not too big either as VD shrink is NOT possible.
- TB is not TiB! Actual space is about 10% less than declared
- Not error, just different units!
- 10% rule works only if size is expressed in TB (not GB, MB).
- Eg: disks declared as 4TB, 6TB, 8TB, 10TB will show in OS as 3.6, 5.4, 7.2, 9 TiB (10% less!)
- Not related to Storage Spaces, that is how plain disk sizes are presented in different units.
Summary
- Not only you can add mixed-size disks to the pool, but you can even get away with zero space leftovers!
- Use capacity calculator TSQL procedure from blog.sqlxdetails.com to plan future disk purchases.
- Please comment if you find this calculator useful, or errors. Your feedback is very appreciated. I am creating and sharing all of this – for you. Thanks!
UPDATE 15.11.2022 – NEW version v1.1 is out! It contains a bugfix in the calculation code. Kudos to Joseph Worrall for discovering the error.
Vedran —
Just ran across your very detailed and well explained post. Great Job and beautiful backgrounds!
Would like your input as running your calculator does not seem to match up to what I’m seeing creating fixed mirror virtual disks in a two and three disk pool.
Example:
First, I create two pools:
1. 2 x 1.2TB Disks (Name = test2)
2. 3 x 1.2TB Disks (Name = test3)
For each of the two pools I create a single Mirror Virtual Disk at maximum size. I get this resulting capasitys:
1. 1.09TB (Name = VDTest2)
2. 1.62TB (Name = VDTest3)
Based on running your TSQL calculator:
EXEC dbo.GetStorageSpaceCapacity @ResiliencyType=’MIRROR’, @NumberOfColumns=1, @DiskSizesGB=’1200, 1200′
EXEC dbo.GetStorageSpaceCapacity @ResiliencyType=’MIRROR’, @NumberOfColumns=1, @DiskSizesGB=’1200, 1200, 1200′
Both virtual disks have been 1.09TB (1.2TB minus overhead) with the second having a LeftoverGB of 1200.
Question is….how is storage spaces pulling this off?
PS C:\Users\administrator> get-storagepool test*
FriendlyName OperationalStatus HealthStatus IsPrimordial IsReadOnly Size AllocatedSize
———— —————– ———— ———— ———- —- ————-
test2 OK Healthy False False 2.18 TB 2.18 TB
test3 OK Healthy False False 3.27 TB 3.25 TB
PS C:\Users\administrator> get-storagepool test2 | Get-PhysicalDisk
Number FriendlyName SerialNumber MediaType CanPool OperationalStatus HealthStatus Usage Size
—— ———— ———— ——— ——- —————– ———— —– —-
12 SEAGATE ST1200MM0017 XXXXXXXXXXXXXXXXXXXX HDD False OK Healthy Auto-Select 1.09 TB
13 SEAGATE ST1200MM0017 XXXXXXXXXXXXXXXXXXXX HDD False OK Healthy Auto-Select 1.09 TB
PS C:\Users\administrator> get-storagepool test3 | Get-PhysicalDisk
Number FriendlyName SerialNumber MediaType CanPool OperationalStatus HealthStatus Usage Size
—— ———— ———— ——— ——- —————– ———— —– —-
11 SEAGATE ST1200MM0017 XXXXXXXXXXXXXXXXXXXX HDD False OK Healthy Auto-Select 1.09 TB
18 SEAGATE ST1200MM0017 XXXXXXXXXXXXXXXXXXXX HDD False OK Healthy Auto-Select 1.09 TB
14 SEAGATE ST1200MM0017 XXXXXXXXXXXXXXXXXXXX HDD False OK Healthy Auto-Select 1.09 TB
PS C:\Users\administrator> get-virtualdisk vd*
FriendlyName ResiliencySettingName FaultDomainRedundancy OperationalStatus HealthStatus Size FootprintOnPool StorageEfficiency
———— ——————— ——————— —————– ———— —- ————— —————–
VDTest2 Mirror 1 OK Healthy 1.09 TB 2.18 TB 49.99%
VDTest3 Mirror 1 OK Healthy 1.62 TB 3.25 TB 49.99%
Would love to figure this out with you and update the calculator.
Thanks!
Hi. From your post, calculation (1.09TB, 1.62TB) exactly matches actual virtual disks created (VDTest2 = 1.09TB, VDTest3 = 1.62TB). Where do you see a difference?
Sorry for the formatting issue. Pasted from notepad and apparently the site does not handle that well. Email me and I’ll send you this properly formatted.
Joe
Hi Joseph. Sorry, I haven’t catch there IS actual difference, and thank you so much for your brilliant discovery! Let’s see example:
3 Disks (A, B, C): 1200GB, 1200GB, 1200GB
When creating a virtual disk with mirroring, calculator gives capacity 1200GB (1 disk) and unused 1200GB (1 disk), but in reality it seems Storage Spaces can utilize ENTIRE space! In reality, capacity is 1800GB (half of entire capacity) and NO unused space. How is that possible?
Since it is mirroring, we allocate 2 disks at once. Let’s imagine allocation unit is half of the disk. In first allocation, we take half of disk A and half of disk B. Next, we allocate half of B, half of C. Next we allocate half of A and C. We used all the space, and total capacity is half of all 3 disks – brilliant!
Now, I need to rewrite the code to accommodate the logic 🙁
I guess, I will go with 1GB allocation loop until all capacity is full – the simplest logic. Not the fastest, but should be fast enough.
Hi Joe! A new version V1.1 is out, with corrected calculation logic. Thanks again!
Came across this Vlog which I found very helpful. I have a question to pose and involves Windows 10…. I recently got (10) 12TB drives on sale. When I try to create one large pool and set this all as Parity it reduces the overall and available pool size significantly to about 70TB. This does not seem right to me as I was expecting a much larger raw storage number from that pool of drives. What am I missing here? I am a Windows user so other options that are available to Linux or standalone solutions are not something I can implement
Hi Alex. Three things decrease capacity:
1) because of 1024 vs 1000 calculation, actual drive capacity is 10% less than manufacturer states. 12TB drive actually is 12*0.9 = 10.8 TB drive.
2) Which “Column Number” of Virtual Disk you have set? That hugely impact capacity. Max for parity is 8.
3) There is some overhead for Virtual Disk metadata, but the should be few GB, not much of a factor here.
I think column count is the biggest factor why you got less. Set it to 8 and see. You will need to drop and recreate virtual disk from powershell, as that parameter is not in the GUI and can only be set during virtual disk creation time. Then you should get somewhere between 86TB (if column count = 5) and (10 drives * 12 TB * 0.9 * 7/8 parity loss) = 94TB if column count is 8 (max).
Vedran – thank you for the prompt reply. I was using just the GUI so I am probably not taking advantage of the full potential of the capabilities. I will give this a shot and let you know. I will need to delete the array as you said and recreate from scratch. I have a Dell PERC H200 controller in the server. Don’t know if that makes any difference in the config process
Hi Vedran,
I have 24 disks 6 x 2TB and 18 x 4 TB in one volume. I want to replace the 6 x 2TB with 4 TB disks. WHat would be the correct procedure to do that?
Hi Morten! I guess you meant “24 disks in one Storage Pool”. You add new drives to the storage pool first, and then retire+remove old drives – all disks at once (or one by one if all at once is not possible). Retirement of disk takes a lot of time, because data is moved away from that disk and is spread across other drives. You can use “Get-StorageJob” to check is it still moving the data or is finished. You probably want to test the process on another storage pool before proceeding to production one. Optionally, after all is done, use “Optimize-StoragePool” to spread data evenly across disks (also a storage job, takes time). Here is how it looks from the GUI side: https://www.tenforums.com/tutorials/83777-remove-disk-storage-pool-storage-spaces-windows-10-a.html
But you will probably use Powershell, like this: https://www.hyper-v.io/can-replace-failed-physical-disk-storage-spaces-direct-windows-server-2016/