
High Speed Storage in Azure?
Have you noticed that storage is a major bottleneck in all cloud providers (Azure, AWS, Google Cloud)? Machine throughput (total MB/s) for storage is severely limited. Even on very expensive server VMs they give you not much more than about 1000 MB/s total. That is, all disks combined. Even that limit cannot be reached because of wrong configuration. This post will make you acheve highest possible storage speed in Azure (and any other cloud provider), by combining multiple disks into single big, very fast storage, that is able to reach machine limit easily. As a bonus, this will save you costs, since total number of disks you need will probably decrease significantly.
Two secrets
Secret no. 1 is to find a machine limit for storage throughput (MBps). This is tricky, since that information is not very clear in Azure, and in Amazon AWS it is hidden from you under several clicks and page jumps, in the middle of very long pages, without direct link to that info from the machine you select. Plus Amazon makes is super-difficult to read even if you found it: stating „b“ (bits, not Bytes!), two different terms for the same thing, two units, mentioning „up to“ (which means „you will get 5% of time that speed, but 95% of time 10x slower speed“). One that can dig through piles of irrelevant info for your VM of interest, and get relevant info there – are true heroes!
If you are one of them who can read that – let me know in the comments, help others to find how! If you are struggling to find info for particular VM size – ask here. Describe your experience in the comment below – thanks!
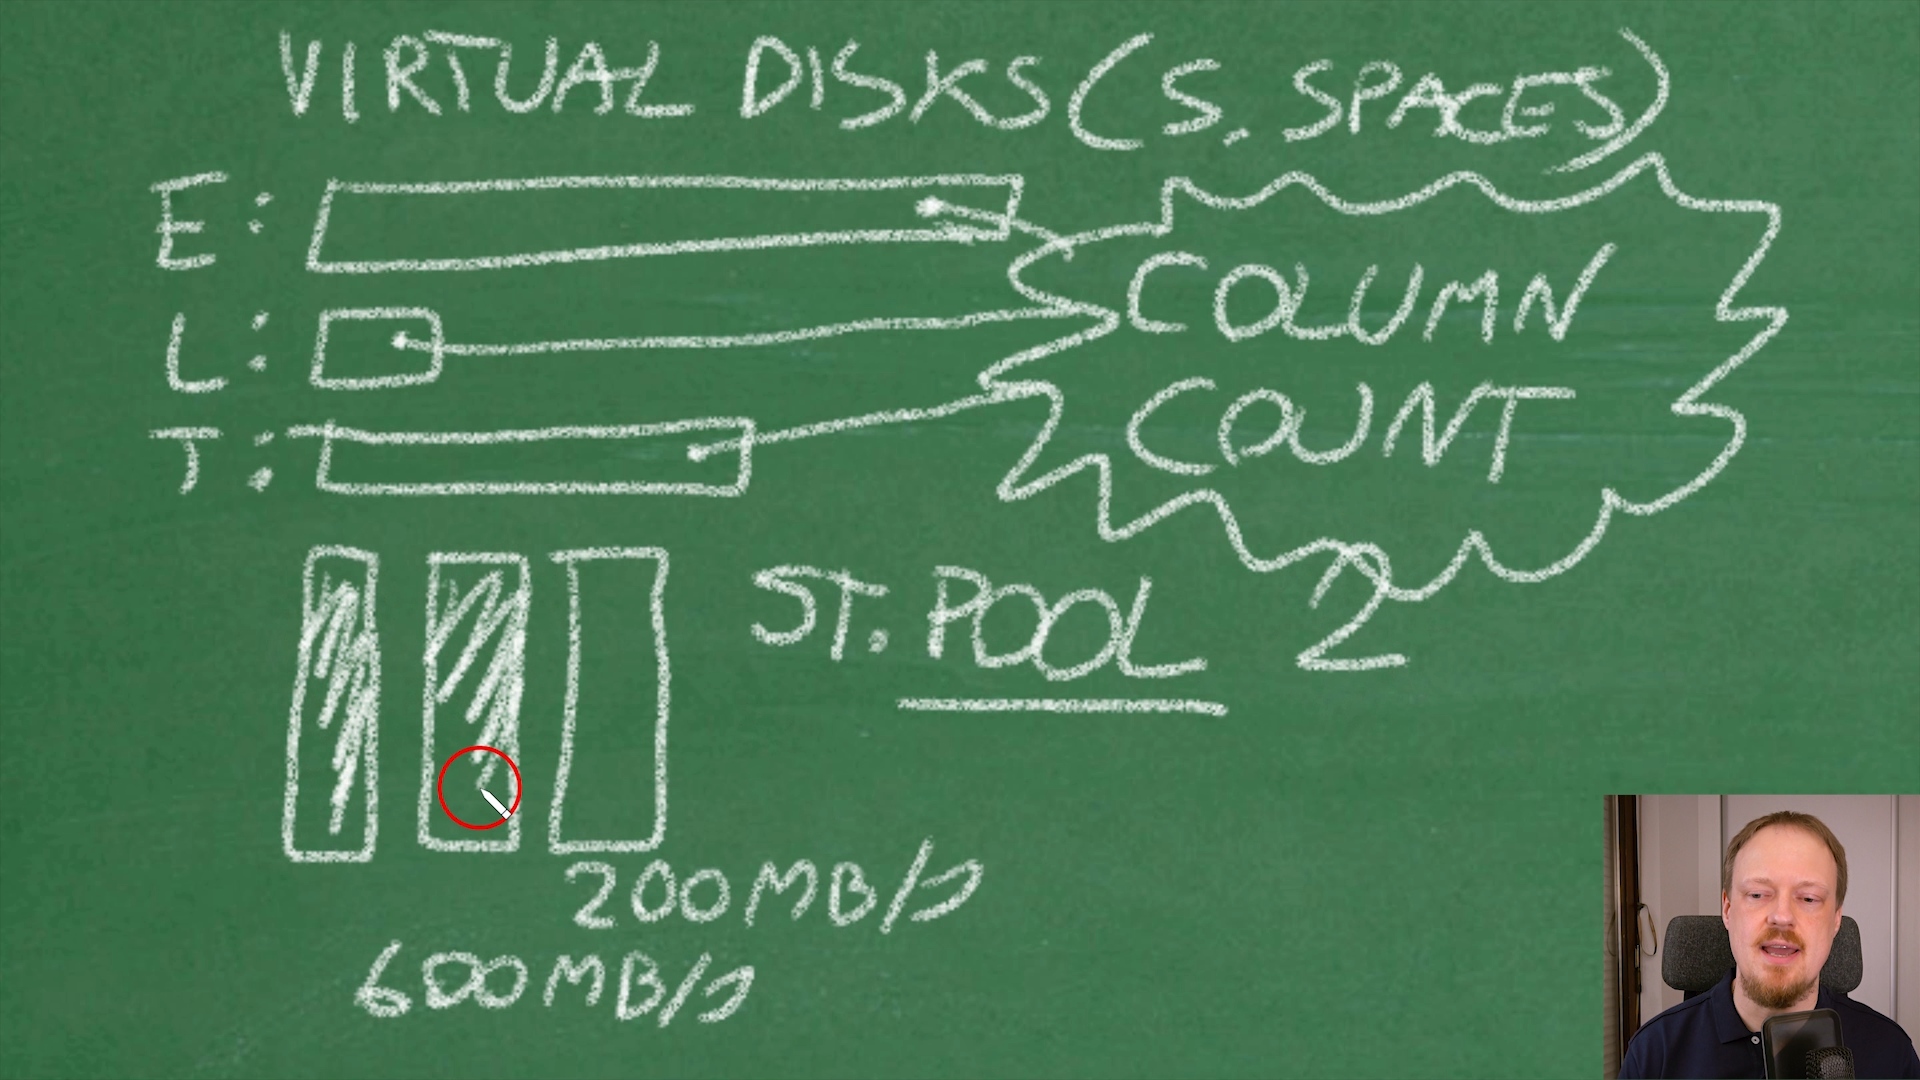
Secret no. 2 is to correctly configure Number of Columns in Storage Spaces. People configure storage pools with multiple disks, then do a common mistake: misconfigure column count or are not aware that this exists since it is hidden in GUI. And the result is – bad disk performance, storage becomes the bottleneck of the system. In the video it is explained what Column Count is, how essential it is for performance, the most important setting, the king of all storage spaces settings – hidden. We will bring this king to light in front of you, both in GUI and Powershell.
What we did?
Idea is to build one big Storage Pool of disks. As many disks as needed to be able to reach machine limit. Then to create as many as needed Virtual Disks on that big pool, being careful to specify Number of Columns – big enough to reach machine limit. Typically it is between 4 and 8 and can be calculated (read on).
First we found our particular machine limit is 1020 MB/s. Then we decided to use P30 disks which give 200 MB/s each. Small calculation (1020 / 200 = 5.1) revieled us we need 6 disks to reach our machine limit (6 disks x 200 MBps = 1200 MBps – the lowest number higher than machine limit). 6 is also a column count we ned to specify per each Virtual Disk we create – super important!
When attaching the drives through Azure portal, it is important to enable „Read-Write Cache“ to get the best performance. We did some measurements, and without cache performance is significantly reduced.
After Storage Pool of 6 disks is created, we created several Virtual Disks (as many you need), each with Number Of Columns = 6, to give them ability to use all 6 drives in parallel and reach machine limit. Now we got a really fast storage here! It will be able to reach promised machine limits easily.
Download the powershell script used in demo here.
Watch the video:
Conclusion
With correctly configured Storage Spaces on any Windows machine we do not only get high speed. We also save money, because now we use less disks in total than before. Additionaly, we get flexibility: if we need more space, we just add a new drive to the pool and expand Virtual Disks. Completely online (no downtime), while SQL is writing to the drives.
|
1 2 3 4 5 6 7 8 9 10 11 |
# Existing Virtual disks foreach($n in Get-StorageNode) { Write-Host $n.Name "(node)" -ForegroundColor Yellow Write-Host "---------------------" -ForegroundColor Yellow $n | Get-VirtualDisk | select FriendlyName, @{L='SizeTB';E={"{0,6:N2}" -f($_.Size/1TB)}}, @{L='AllocatedTB';E={"{0,6:N2}" -f($_.AllocatedSize/1TB)}}, @{L='AllocationUnitMB';E={"{0:N2}" -f($_.AllocationUnitSize/1MB)}}, @{L='InterleaveKB';E={"{0:N2}" -f($_.Interleave/1KB)}}, NumberOfColumns, ResiliencySettingName, ProvisioningType |Sort FriendlyName |ft } |
Use this Powershell query to check your VMs. Do they have NumberOfColumn high or it is painfully slow „1“? It can be fixed – but only if you catch it.
Very nice video Vedran
You Are The Best
Thank you Sunder very much!
Hello, great post. Microsoft recommends to use same number of tempdb files as the number of logical processors up to 8 logical CPUs. In this configuration the files are already being striped between the drives. Theoretically if we had 8 CPUs and then split the tempdb into 8 files on the dedicated temp db drive then SQL first splits the tempdb work between the files and then the disk stripe the work. This double split seems seems to be unneeded overhead. So then we are back to just using one file for tempdb. All comments are welcome.
Hi and thanks for the comment! Multiple tempdb files actually solve an issue in RAM, called “latch contention” and not disk. It sounds weird to solve RAM contention with disk files – but is true. Usually we start with 4 tempdb files, and end-up around 1/3 of cores (depends on workload), max 8 files. Eg start with 4 and measure do we have a contention on tempdb latches and if yes, increase the number of files. That is independent of disk internal layout. With Storage Space technique from this blog post we just get a faster storage, but we still need to have as many tempdb files needed for latch contention to dissapear. I believe Azure disks are just resources that guarantee certain MBps and IOPS, a slice of SAN’s total performance, not an actual disk in SAN reserved just for us.